Friday, 9 August 2013

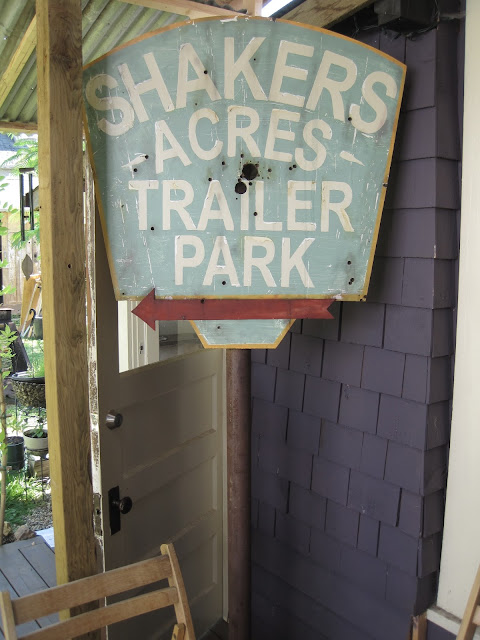
Shakers Acres Trailer Park Sign

I was asked by Mike (Collide Entertainment) if I could build and design a sign for the set of a music video for the band The Harpoonist and the Axe Murderer. 


I had a 3’X3’ piece of 1” plywood with an Arborite finish that was used as a counter top in a part of my house that I took out. I was never going to use it but it will make an amazing sign, since it already has an old look to it. I cut the top round using a skill saw tied to a string which was anchored to the bottom center of the plywood. I need some letters so, I experimented with the size by printing out letters and found that 6" was a good fit.


I tried a solid stain (greeny/blue) to see what that would look and work like and also added an orange coloured border. I thought by using a solid stain that it would easily scratch to give that old tin look. which worked perfectly!


Once I had all the letters in place I was able to trace them and they left a mark in the paint outlining where I needed to paint.


I finished painting the letters and was not satisfied with the shape. I cut the sides on a slight angle then added a little detail by cutting more angles at the bottom of the sign to match where the sign will join the pole that holds the sign up. 


Let's make it look old. I started to put some black rain stains and scraped some of the letters as if they had peeled off over the years. 


Put it on a stand using an old support pole that I found in my basement and attached it to a X-mas tree holder ... the sign now stands on its own. Added an arrow and thought we needed more bullet holes ... of course!


Here is the finished project with aged arrow and bullet holes. 


Here is another shot of the whole sign on the stand.

What a fun project ... amazing what you can do with some stuff just lying around. I should go into the fake vintage sign business eh? I can not wait to see what it looks like in the music video.


Monday, 29 July 2013

A window that serves two purposes

I took out a window from what used to be the outside wall of our house. It was a good window so I re-used it in a new addition to the house which we refer to as the Reflexology Lounge. Now there is this big ugly opening.  

Here's the issue - On one side is Emi's Hair Salon so if I block off the opening, it gets really dark, but on the other side is where I do my work. When I have a client especially a massage client there is no privacy so blocking it off is necessary ... what to do? Mmmmm A covering that blocks but can also open???

Materials I had - I looked around to see what I had. I found a small pile of old weathered wood that my Dad had behind the garage of his house. I also had a couple of really old hinges. 
This is Emi's View with the hole in the wall. (After I did some painting)
Here is my view of the hole from the Reflexology Lounge
Emi's side - was easy enough to make look good, just finish the opening off with some of that old weathered wood.


Added the bottom and side

Simply finished with trim looks way better and goes more with the feel.
Now to My side of the Story ... to cover the opening but also open for Emi.

Building two panels
One of the panels in place
The other panel is held by the old hinges
Fully closed blocking off the rooms.
So this is what I came up with and it looks really great!

The finished product.


Wednesday, 17 July 2013

Eureka Beer Guide (website)


Imagine if your job was educating people about BEER! 

This is what Ken from Eureka Beer Guide does. Ken needed a website and was working with Michele from wordglow.ca .

They asked me if I could help them design a logo with the inspiration ... Experiencing a eureka moment about beer! 

The eureka Beer Guide Logo

 The eureka Beer Guide - light-bulb beer-head


Website: I guess they were happy with what I did with the logo because they asked if I could help with the website. I set-up the theme of the website, added design elements/pictures, general flow/workability and feel of the site ... of course with the guidance of Ken and Michele.

Screen shot of Eureka Beer Guide


Please check out the site, the information is amazing and Hey ... its about BEER!

Thursday, 21 March 2013

The Attic - Wall project

I have been creating a little space in the attic to relax and have my own space. I have one wall that I never finished.

I have been doing some spring cleaning and wanted to get rid of some wood ...
Do I have any wood to finish this wall???
Well, I have a bunch of pieces of wood.

Welcome to The Junk-Wood Wall


On the way ... not too sure this is a good idea.
The finished wall, I think it looks pretty good.
Side view of the wall ... it is quite practical since it has natural occurring shelves


The many layers of wood at different and random thicknesses creates a wall that has many natural occurring shelves. as you can see in the above picture. 

Also another bonus is I do not have to make a trip to the garbage dump.


Saturday, 20 October 2012

Pure Touch - Business cards

A Fellow Reflexologist asked me to make him a Business card.
Here was the first Idea
Front - Pure Touch 1
Back - Pure Touch 1
After sitting with the design for awhile Gary felt it was not him anymore and came up with the next design
 Gary does amazing work you can check out his website: www.puretouch.ca

Thursday, 18 October 2012

Lighting my Desk

I live in a very old house. Good Lighting is a little difficult to get without having to re-doing the entire electrical in the house. Simple cheap solution: 2 hanging lights, like cafe lighting above my desk. I have a dimmer switch on an extension cord that I will plug these lights into.

I went to Ikea and bought the cheapest hanging wire with light socket and plug, (which happened to be on sale for $4.99each) they were this funky green colour which I liked. My neigbours fence had fallen down and there was this amazing weathered wood which I grabbed up right away before it went straight to the dump.

I cut a hole to fit the light socket, in a small 4inch X 4inch by 1inch thick cedar board that was in my to burn pile. Then cut the fence boards to 9inch lengths and found the ones that fit nicely together. I Used 2 different sized drill bits to randomly drilled holes to allow some light through. Screwed the fence boards onto the small 4X4 board put the light through and tightened the plastic ring to hold the lampshade on ... there you have it! sweet inexpensive one of a kind, your very own internet cafe lights.


Kids Stool

My Friend asked if I could build him a kids stool for his 2year old. He looked everywhere for the right size but could not find it.

I built it with a left over 2X10 (legs) and some 2X4s pieces (the top of the seat). To make it safe and not easy to tip over ... the legs are out by 5degrees. The finish is some left over solid stain, sanded of on the edges to give it that worn look.

The finished Kids stool